Research Computing
Savio HPC (High Performance Computing)
Savio High Performance Computing (HPC) Linux cluster is designed and maintained by Berkeley Lawrence National Labs and Berkeley Research Computing which has more than 600 nodes, 15,000 cores, and 540 peak teraFLOPS. This valuable shared computing resource is used for the most computationally intensive workloads that require performant CPUs, RAM, and disk as well as machine learning tasks that require the use of graphics processing units (GPUs).
HPC systems operate on a fair share model which encourages users to plan for their job resource allocation in advance to optimize system resources and to prevent inadvertently impacting or crashing other user’s jobs by consuming more resources than are available. Savio uses a tool called Slurm to help manage jobs.
The lab manages two HPC accounts for Demography: co_demography and fc_demog
co_demographyis our department’s Condo Account which we’ve purchased equipment for and have priority access on the cluster to asavio4_htcnode.fc_demogis a general use account that has more standard wait and queue times.
Creating Savio Account
Initial steps to access Savio are to create a BRC account, accept the terms of use, and join the
co_demographyand/orfc_demogprojects.More detailed instructions on joining Savio.
You will also need to create a pin + one-time password (OTP) combination for logging into Savio. The pin is a fixed four digit number and the OTP is a six digit number generated via an authenticator app. These two sets of numbers together, without spaces, is your Savio password.
With your credentials you can
sshinto Savio’s login node:
ssh <your-savio-username>@hpc.brc.berkeley.edu
Running Savio Jobs
Savio is composed of several nodes, each with their own specialized purpose and resources. When you first access Savio, you are accessing a login node which itself is simply a place to keep and edit scripts, and eventually schedule the computation on a specified node.
⚠️ Do not run your analyses on the login node ⚠️. When you are ready to schedule your job, you next identify the node you want to run the computation on (savio4_htc, savio4_gpu, savio3_xlmem, etc.), and specify the length of time it should run.
At a high level there are 3 ways to run a session on Savio:
- Interactive, web-browser using Open OnDemand: This is the best way to run programs in RStudio, Jupyter Notebooks, and VS Code IDEs.
- After logging in with your Savio credentials, navigate to
Interactive Apps, select your environment (Jupyter, Rstudio, Matlab, etc.) and specify the time and compute resources required for your session. Most of the time you will selectcompute via Slurminstead ofcompute on shared OOD node for exploration

A basic configuration for a job on the
co_demographyaccount, requesting 1 savio4_htc node with 8 CPU cores (32 GB of RAM) for 1 hour: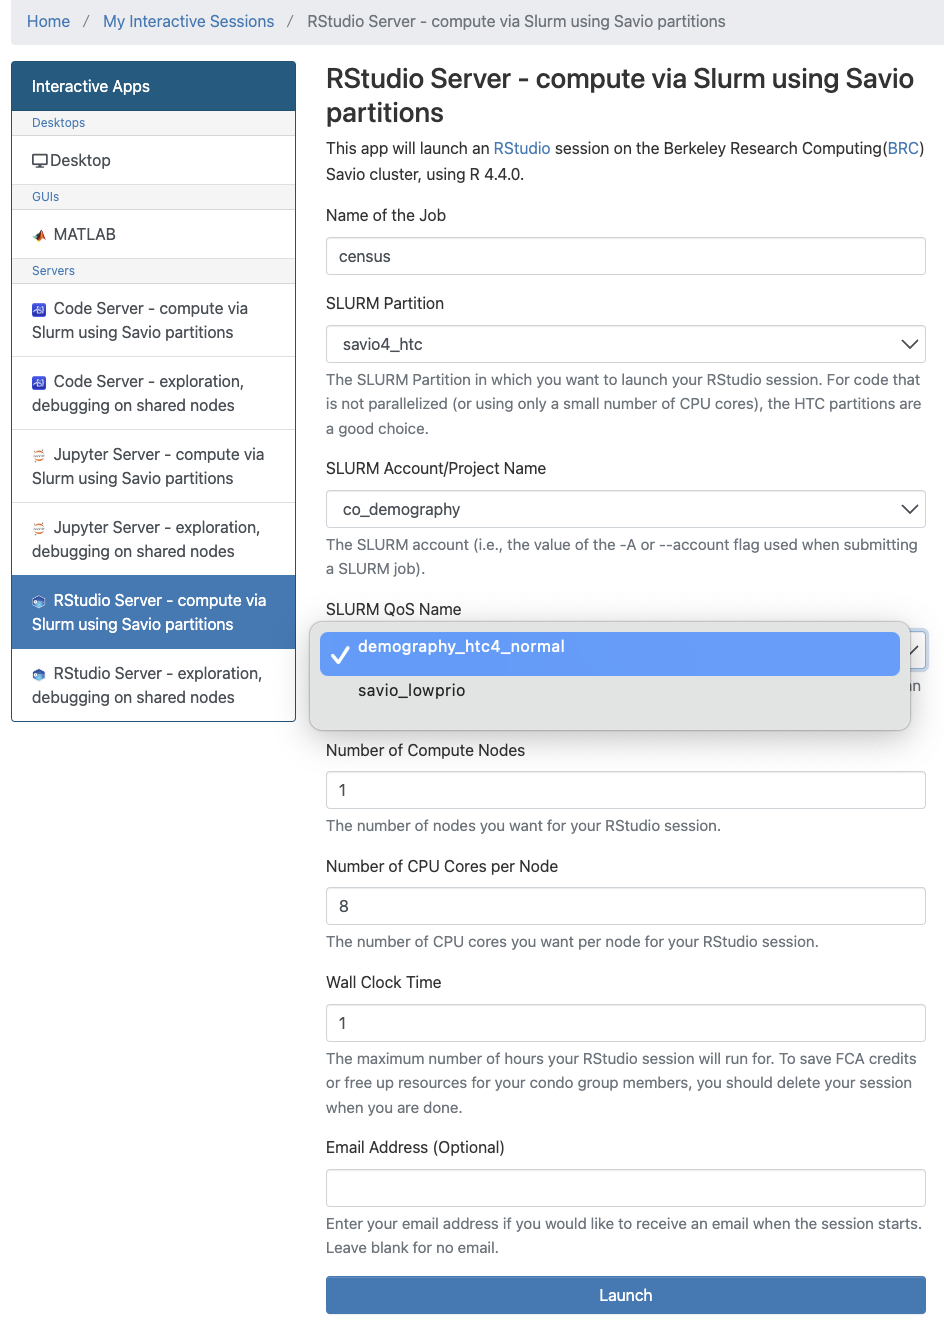
- A few notes about configuring jobs in Open OnDemand:
- If submitting a job under the
co_demographyaccount/project you should also pair it with the SLURM partitionsavio4_htcand SLURM QoS Name:demography_htc4_normal. You can use the other partitions and QoS but wait times might be more variable. - While the
savio4_htcnodes comes equipped with a total of either 256GB or 512GB, by default you are only assigned 4GB per core. To request more RAM, request more cores. More here - After your session has launched, you can check how many resources have been allocated in a shell using this command:
sacct --format=jobid,start,partition,NodeList,AllocCPUS,ReqMem - If launching a Jupyter session it will default to root (/) directory and you won’t be able to launch a notebook without a permissions error. You will need to use the left hand panel to navigate to either your home (/global/home/users/yourusername) or scratch directory (/global/scratch/users/yourusername)
- If submitting a job under the
- A few notes about configuring jobs in Open OnDemand:
Interactive, terminal: This allows you to run programs interactively as you normally might on your own laptop’s terminal. To queue an interactive terminal session, you use the
sruncommand specifying, at a minimum, the savio project you belong to, node partition, and time to allocate. Additionalsrunoptions.Example srun command that schedules an interactive session on the co_demography account, using the condo QoS, for 8 CPU cores on the savio4_htc node for one hour:
srun -A co_demography -p savio4_htc --qos demography_htc4_normal -t 01:00:00 --cpus-per-task 8 --pty bash
Batch, terminal: A batch job will run in the background via terminal. You use the
sbatchcommand to execute a script which contains your instructions to Savio.Batch processing is best for longer running processes, parallel processes or for running large numbers of short jobs simultaneously. If your code can be left running for a significant amount of time without any interaction consider running it as a batch job.
Additional templates for how batch scripts are organized.
Other useful commands:
scancelto cancel a jobsinfoto get current information on the queue- More here
To troubleshoot a job or to see how long it will take to run see this documentation
Storing and transferring data on Savio
Each Savio user has two home directories that only they have access to. This is your own personal space:
/global/home/users/yourusername(30 GB quota)/global/scratch/users/yourusername(Virtually unlimited but temporary)
⚠️ Please note that files in scratch storage that have not been accessed in 120 days will be purged ⚠️
The department also has persistent Condo Storage which we use for sensitive data projects. Only approved users can access the directory which is located at:
/global/scratch/p2p3/pl1_demography/
You should be responsible for regularly cleaning up unneeded files. If you run into problems please reach out to the Demography Computing Director. More about Savio Storage
To transfer data in and out of Savio you will need to move the data to a dedicated data transfer node (DTN). An example transferring a file on your laptop to savio using scp:
scp <file> <your-savio-username>@dtn.brc.berkeley.edu:/global/scratch/users/<your-savio-username>- Savio is approved for P2/P3 level data but check with computing director before working with any sensitive data.
Software on Savio
Modules: To see a list of available software, type:
module availableto load software into memory:
module load <name-of-software>/<version-number>Stata is not available by default on Savio but the department sponsors 3 seats for Demography use. To access Stata-MP follow these instructions
Analytics Environments on Demand (AEoD) & Secure Research Data and Computing (SRDC)
Analytics Environments on Demand (AEoD) is a virtual machine service for researchers who need to run analytic software packages (Python, R Studio, Stata, Matlab, etc.) on a platform that is scaled up from a standard laptop or workstation. This allows for custom analysis environments best suited for short to medium term project timelines. AEoD virtual machines are available running Windows or Linux OS, and may be used with moderately sensitive (P3) data. The AEoD Service is offered as a partnership between Research IT, Demography, and the BPC.
Secure Research Data and Compute platform (SRDC) is designed for highly sensitive data (P3/P4). Through the SRDC, we provision custom servers for restricted-use and sensitive data. These machines range from 2-16 cores with 8-128GBs of RAM each depending on the application and data protection level. The security architecture of the SRDC leverages campus information security services such as intrusion detection, multi-factor authentication, and access control systems. The SRDC platform has been assessed and reviewed by private cybersecurity firms to meet or exceed administrative, technical, and physical controls based on requirements provided by the NIST Risk Management Framework as well as EU laws such as GDPR. For secure data transfer, the SRDC uses a dedicated data transfer node (dtn.srdc.berkeley.edu) with file transfer utilities such as sftp, rsync, and the Globus gridftp server under a HIPAA-compliant subscription to ensure encrypted transfers.
Data Transfer
scp
scp (secure file copy) is an elegant and simple way to move smaller files over a network. It’s general usage:
To copy a file from your local machine to a remote server:
scp <file> <user>@<host>:<dest>To copy a file from a remote server to your local machine:
scp <user>@<host>:<src> <dest>rsync
rsync is a command-line tool that is useful if files being transferred are larger than what scp can handle. It is much more feature rich and has built in mechanisms for checking file integrity
To copy a file from your local machine to a remote server while maintaining file properties, compression for faster transfer, verbose output, and showing progress:
rsync -avz --progress <file> <user>@<host>:<dest>rclone
rclone is a command-line tool that can connect to cloud storage services such as: Dropbox, Box, Google Drive, sftp servers, and many other file services. It preserves timestamps and verifies checksums at all times. Transfers over limited bandwidth; intermittent connections, or subject to quota can be restarted, from the last good file transferred. Rclone has rich documention and supports many different cloud services. The first step is to configure rclone:
rclone configFrom there, you might execute basic commands to ls and copy files between locations.
List content of remote directory
rclone ls remote:pathCopy /local/path to the remote
rclone copy /local/path remote:pathGlobus
Globus is ideal for securely transferring large files (gigabytes, terabytes, petabytes) and/or large numbers of files at high speed. It allows you to start an unattended transfer and have confidence that it will be completed reliably. To get started, check out the step-by-step guide.