
How to Do an Interview
Mariana Zaragoza, last updated 2026
Contents: Summary | Tools | Steps
Summary
This project starts out the series “Reading Our Heritage.” It was also about doing a professional, video interview, from inception to planning and execution. The interview was done as an expert interview with preprepared questions using Zoom to record and iMovie (plus some Adobe Premiere) to do minor edits.
The end goal was to to publish the video with a digital surrogate (i.e., copy) of a 3 to 10 minute interview about a cool historical document. That intention meant that we had to plan not only to do the interview, but gather permissions for rights as well as think about platforms for publishing.
Here’s the output!
For more information about Sole Trader Agreements, look at the associated project page.
Now, how did we do that?
Tools
For this project, the DH team used their laptops with Zoom and parts of the Adobe Creative Suite installed in part because that is software available across the UC Berkeley campus. Researchers can use Open Access options, including Discord, for recording.
Hardware
- Dell computer with Windows 11 Pro Education
- Macbook
Software
- Zoom for recording (version 7.0.5 on Windows)
- YouTube STudio for hosting
- iMovie 10.4.2, the version as of this recording.
- Adobe Premier (check out Software @ Berkeley’s page for information about how to access as a UC Berkeley community member)
Contextual Overview
For this expert interview, Deborah Lee, part of the California State Parks, joined us to discuss a late 19th-century Fem Sole Labor Agreement from Sonoma County in California.
Lee brought a copy (i.e. surrogate) of the document from the California State Archive in Sacramento as they could not (nor wanted to!) bring the original out of the Archive. Lee’s goal in collaborating with us was to develop learning materials for the California State Parks.
Material Used
The material we worked with heritage material as well as created digital material.
Heritage
- Eliza Cook, Fem Sole Trader document from the California State Archives, Office of the Secretary of State, Sacramento
- Statutes, online
Forms and Contracts
The legal side of
Created
- video interview
- transcript
- write-up (this document)
Steps
This section provides a narrative description of the steps taken to complete the process. Each step includes a general statement of the goal and then provides a short description of how the project lead implemented the step.
Preparation Work
- define project goal
- scope my questions
- explore best practices
- reach out to potential narrator (i.e., interviewee)
Source Acquisition
Because this project focuses on the expert’s knowledge, the heritage material we used for the project came from them. In this case, Lee (the Narrator) chose a document from the California State Archives and provided us with a surrogate (i.e. copy) as they could not remove the document from the State Archive.
The State Archive Material was provided as high quality scans.
Rights and Reproductions
Because the intention of the project was to publish the material online, the DH Team explored rights with both Deborah and the Hosting repository.
As a CA government document, the material is in the public domain. For quality and courtesy:
Prepare for the Interview
- Write questions. If you need to compare answers between interviews, it’s good to ask the questions exactly as you have prepared them. If comparison isn’t needed and the interview will be treated individually, then the questions should gently guide and/or be paraphrased as prompts.
- Share questions with the narrator (unless surprise of emotion is your goal). This is partly so that they understand what the interviewee wants from them. Some narrators will hyper-prepare and you will lose some general, emotive response, but the narrator (and interviewer) are also more likely to be calm throughout the discussion and less likely to stumble over words.
- Arrange a date, place, and time. Be prepared for this to change and make sure to express appreciation.
The Interview, Day of
- Prepare the room in advance. I recommend:
- Having water and cups at hand
- Potion your table and/or chairs
- consider your background (nothing distracting unless that’s the goal)
- think about lighting (avoid blinding people, but don’t backlight them unless the intention is to obscure)
- Have print outs of
- interview contract
- surrogates of/or the original material for reading
- questions
- Make sure to
- Greet your guest and thank them
- Discuss permissions including
- contract for rights
- next steps
- Start the interview
- Make sure to press record
- Hold the interview or discussion
- At the end, make sure your video has saved. Open it to be sure you have the file.
Post interview
Video Editing

- First open iMovie and prepare to upload all videos and documentation.

- Upload everything you will need by dragging it into the media section.
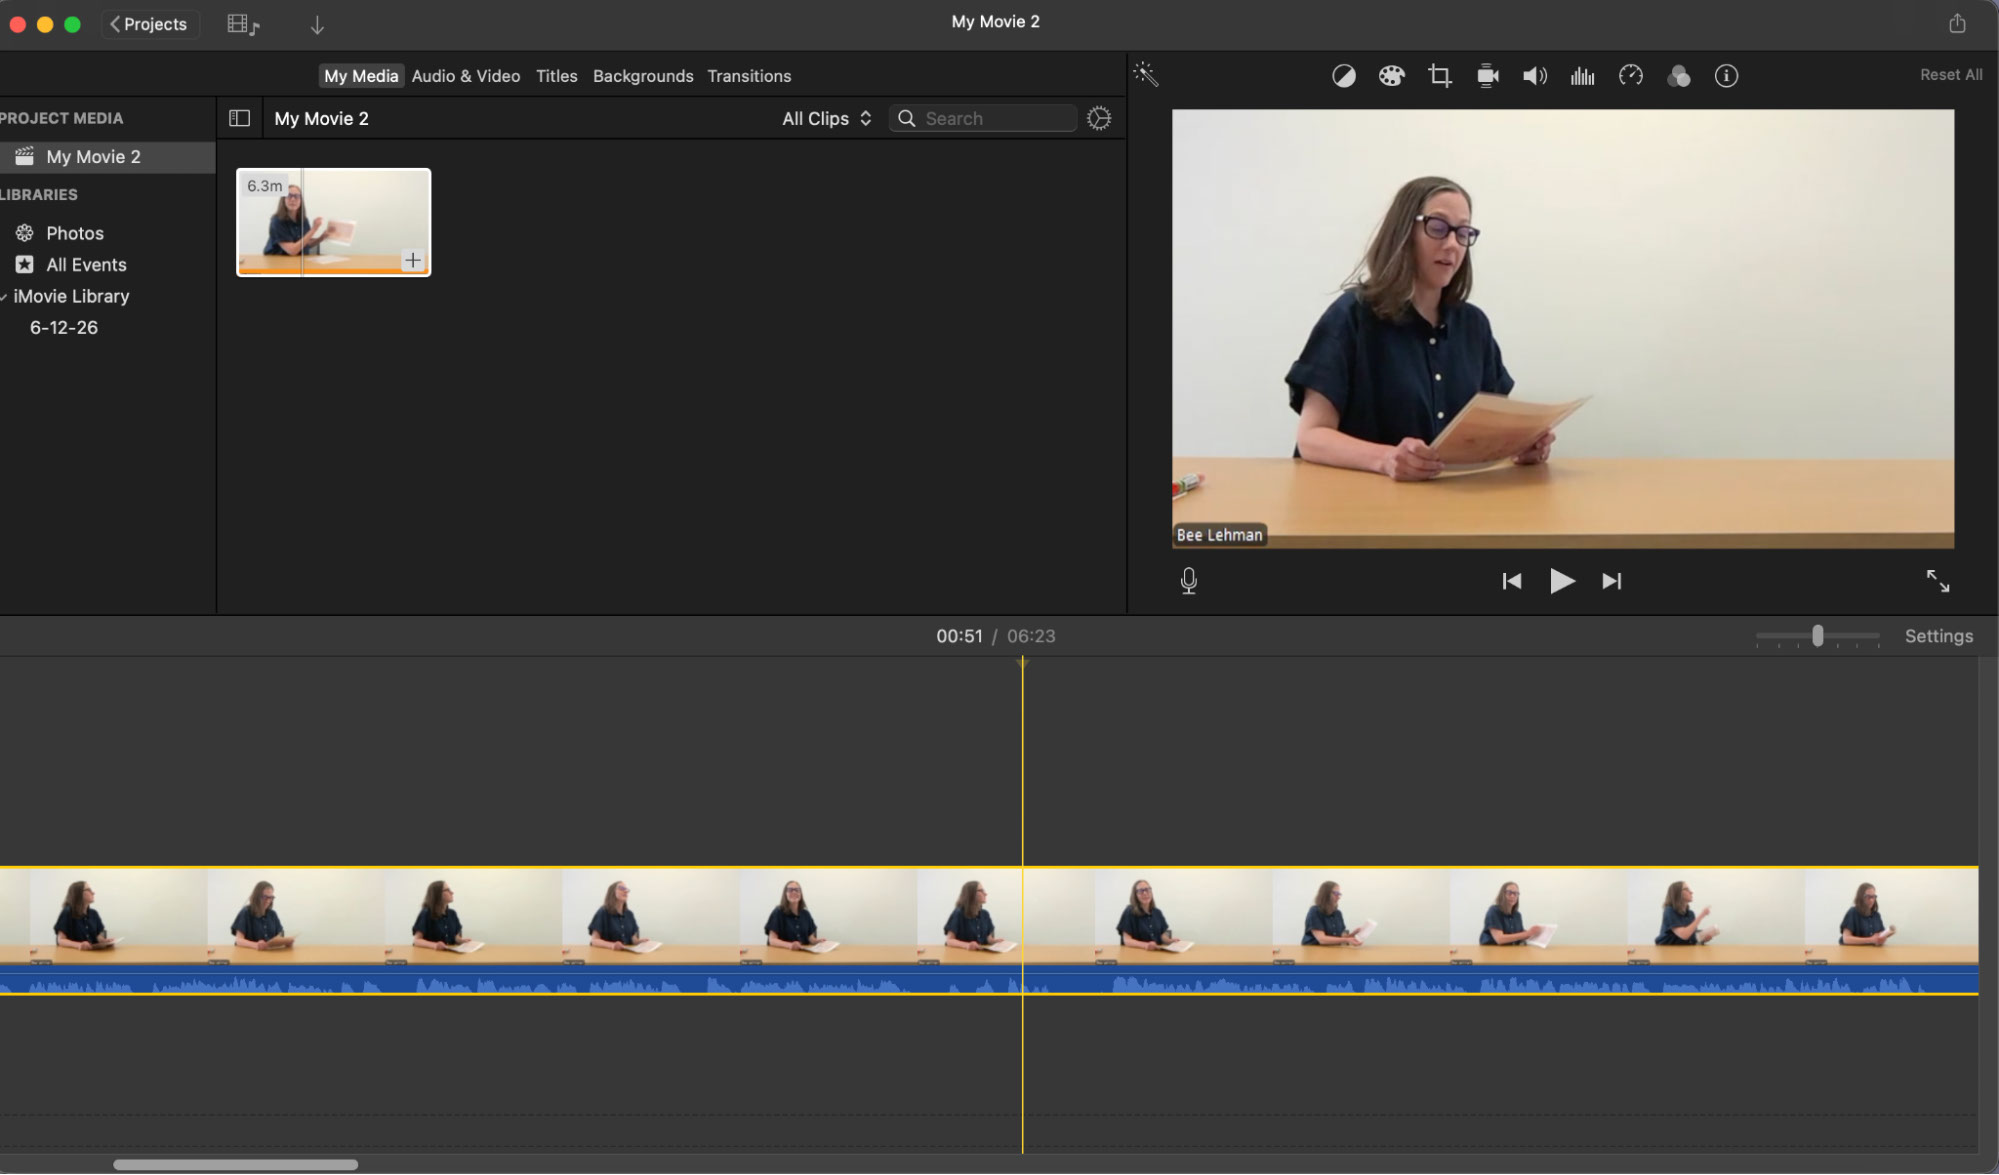
- Drag the video onto the area where it says drag and drop videos to begin editing. In this video there are parts that needed to be cut and removed. Find the part you want to delete.
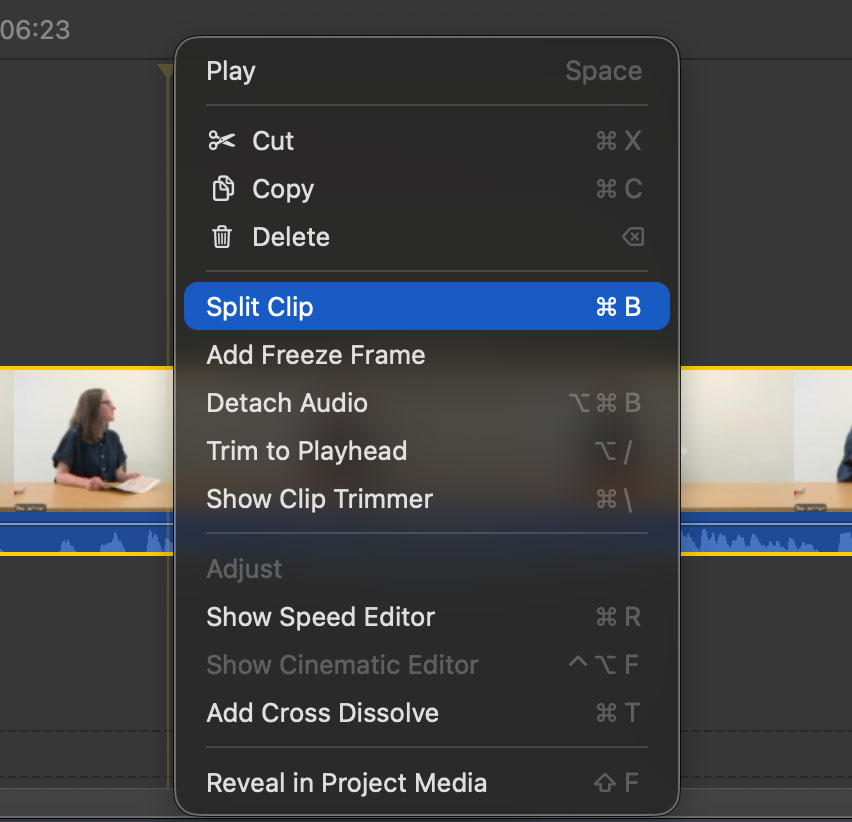
- Double click and then “split clip” to create two separate clips.
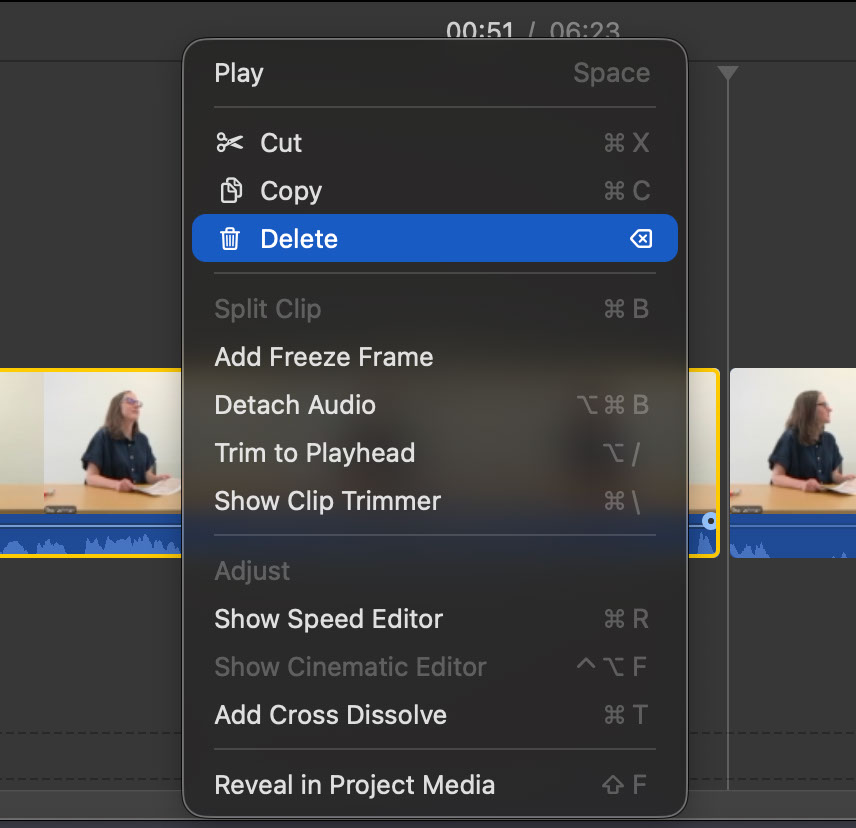
- Delete the unwanted clip. Repeat for any parts you do not want in the actual interview.

- To create the title for the speaker’s name, find the title area and click on that. Choose whichever one works best.
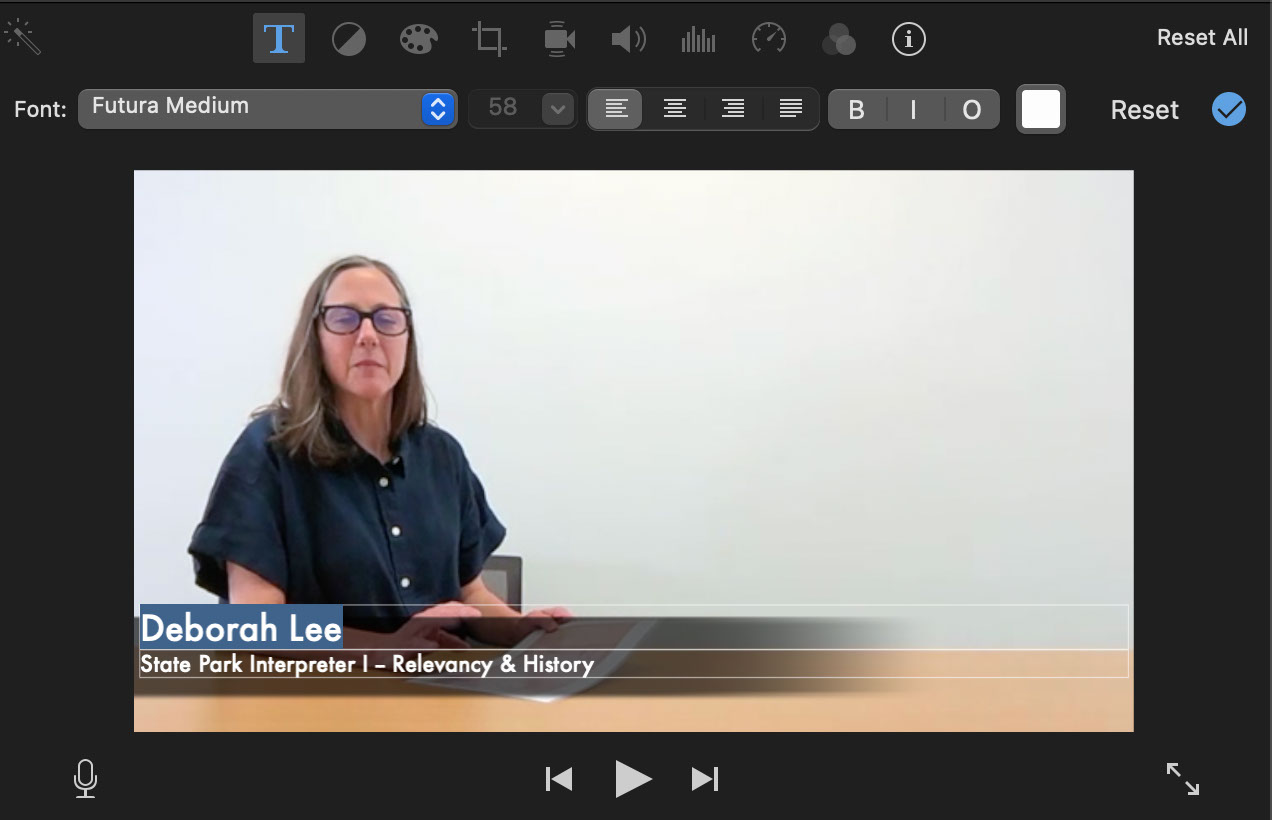

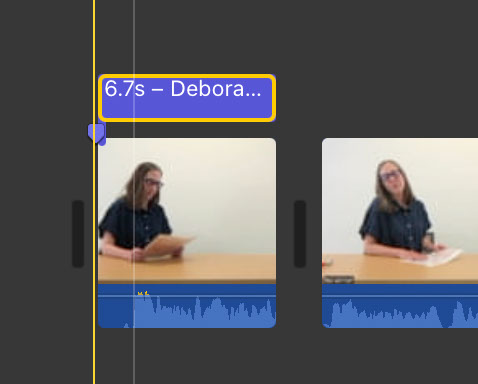
- Fill in the speaker’s information!
- Make sure it is not showing up through the entire video and drag it to last about 10 seconds.

- Now, to bring in media on the screen, drag one of the images down into the reel area.
- Before messing with it in the real area, you must make sure the picture settings are correct.
- You will need to remove the crop and allow it to be full size.
- Then, rotate the image so it’s upright.
- The most important part here is to now select “Picture in Picture” or else it will take up the whole screen. You can do this with arrows too.
- The image will appear tiny on the screen so you should expand it.
- Lastly, move the bar with the photo so it stays on the screen for your desired time.
- Repeat any of these image steps to add more!
Additional Considerations
As part of video editing with an eye toward publication, there are a few things that you should consider:
- creating closed captioning/subtitles
- this is a legal, social, and institutional requirement particularly if the material is going online in spaces such as YouTube
- checking in with the narrator (i.e., interviewee), if possible, and make sure that they are alright with what you’ve covered.
- removing portions of the video, if the narrator desires, is good practice
- consider title cards and ending cards for framing the piece at the beginning and giving credit at the end
- thinking about adding notes into the video with corrections or titles to ease the viewer’s understanding of the interview
Publishing
For this project, we are using our group YouTube channel and linking through our Github Repository. For the YouTube video, we are adding metadata and timestamps through YouTube Studio. As with all Google products, however, lifetime is limited by institutional connection to the account and maintainance agreements.
We also plan to write a blog post celebrating the inaugural episode and linking out to it. Institutionally, this means that our local Digital Archive will crawl our blog once a year and archive anything that’s one layer down.
Future Plans
Make sure as you publish to reconsider your future plans. Some things to think about:
- Should the interview be online longterm?
- Does it have companion parts?